"I fear that so many feel that a long-term supply is so far beyond their reach that they make no effort at all. Begin in a small way…gradually build toward a reasonable objective.” -President Gordon B. Hinckley,

Thursday, February 12, 2015

Water storage containers: Pros and Cons

When it comes to emergency preparedness there is no "one size fits all" solution. Water storage is one of those items each family must determine the best solution for them. You can read my previous post about water storage. Here are more details on different solutions to help you decide which solution will work for you.


Used 2 liter soda or juice containers 


Pros
– Essentially FREE if you buy them anyway or get from someone else
– Convenient size for smaller water emergencies
– Easy to store anywhere in the house

Cons
– Must rotate every 6 months to 1 year
– Hard to clean out enough so the taste isn't “off”
– Concern about bacteria if not cleaned out well enough


Best Used For
– 72 Hour Kits
– People on a tight budget
– Small spaces storage solutions

Store Bought Water Bottles


Pros
– Great tasting
– Easy to rotate through the individual bottles
– Easy to store anywhere in the house

Cons
– Must rotate every 6 months to 1 year
– Price per gallon can be fairly expensive
– Difficult to store in large quantities
– Bottles will freeze in winter, and chemicals can leach into them in severe heat, so not ideal for car kits in extreme conditions

Best Used For
– 72 hour kits
– People concerned with taste of drinking water
– Small emergencies

Water Pouches or Cartons


Pros
– 5 year shelf life!
– Awesome for 72 hour kits
– Water typically won’t freeze in the pouches or small water boxes

Cons
– Expensive storage method
– Not ideal for large quantities
– Not available in local stores everywhere

Best Used For
– 72 Hour Kits
– Car kits

Found Online

5/6 Gallon Plastic Jugs


Pros
– Decent price per gallon
– More convenient size than large barrels
– Pretty easy to empty and rotate
– Easy to find in the camping section of most stores

Cons
– Many of these jugs end up having problems with cracking and leaking so beware
– 5 or 6 gallon jugs can be HEAVY if you are trying to pour with them and haul them up and down stairs by yourself
– Must be rotated every 6 months to 1 year
– Take up a lot of space in storage since you can’t stack them

Best Used For
– Smaller storage spaces
– Tighter budgets

Found Online
Options at Amazon.com

Water Box Kits ( Mylar bags inside cardboard boxes)


Pros
– Good price per gallon
– Stackable up to 3 boxes high
– Only have to rotate every 5 years

Cons
– A little bit complicated to set them up and fill them
– Wasted space in your storage room above the stack of boxes
– Not very convenient for accessing small amounts of your water storage
– Not available in local stores everywhere

Best Used For
– Larger quantities for people who don’t like rotating
– Great for sliding under beds or sticking on closet shelves

Found Online
– Boxed Water Kit

Water Bricks


Pros
– 3.5 gallons per brick makes it more manageable than 5/6 gallon containers
– Stackable from floor to ceiling!
– They are safe to freeze so can be stored outside
– Great size to stash under beds, in closets, etc.

Cons
– A little more expensive per gallon
– Not available in local stores everywhere

Best Used For
– Storage rooms where space is an issue
– Shorter term water emergencies for drinking and cooking
– People without considerable budget restraints

Found Online
– Water Bricks

Water Barrel


Pros
– Best solution for storing LOTS of water
– Available in multiple sizes from 30 gallons up to 250 gallons
– With additives, can extend rotation needs to every 5 years
– Great use of floor space in a storage room with a water barrel tower

Cons
– Slightly difficult to fill and rotate
– Not very accessible when you have to actual USE the water
– Not an ideal solution in small homes/storage areas and can’t be stored outside

Best Used For

– Longer term water shortages
– Large quantities of water storage

Found Online
– Water barrels from emergency essentials
– Water Barrel

There are larger water storage containers available as well. If you have the space available they can be a great option. I use a combination of these containers. Find what works for you and get started on your water storage today!

Thursday, September 11, 2014

Essential Oils


My most recent "wow" experience with the oils came just as we were preparing to move to Southern California. My two year old was stung by a bee on his foot. I'm pretty sure he stepped on it. This was the second time in two weeks he had been stung. I immediately scraped off the stinger and began applying the essential oils. I applied 1 drop of basil oil, 1 drop of lavender oil, and 1 drop of cleansing blend to the sting. I continued to apply the oils every 15 minutes for the next 2 hours. I would have continued to apply them beyond the 2 hours, but it was bedtime. 


                                              This is his foot the day of the sting.

                                                           Red and swollen
                                                             One swollen foot

In the morning, the swelling had gone down quite a bit and walking didn't seem to bother him. I applied the oils every hour for the day and by evening his foot looked normal again. 


                                               24 hours after the sting. Swelling is reduced.

                                   24 hours after the sting. Redness and swelling reduced.

I am so thankful for essential oils. To learn how essential oils can help your family please contact me at OneDropForWellness@gmail.com


Thursday, April 24, 2014

Emergency Food Bar

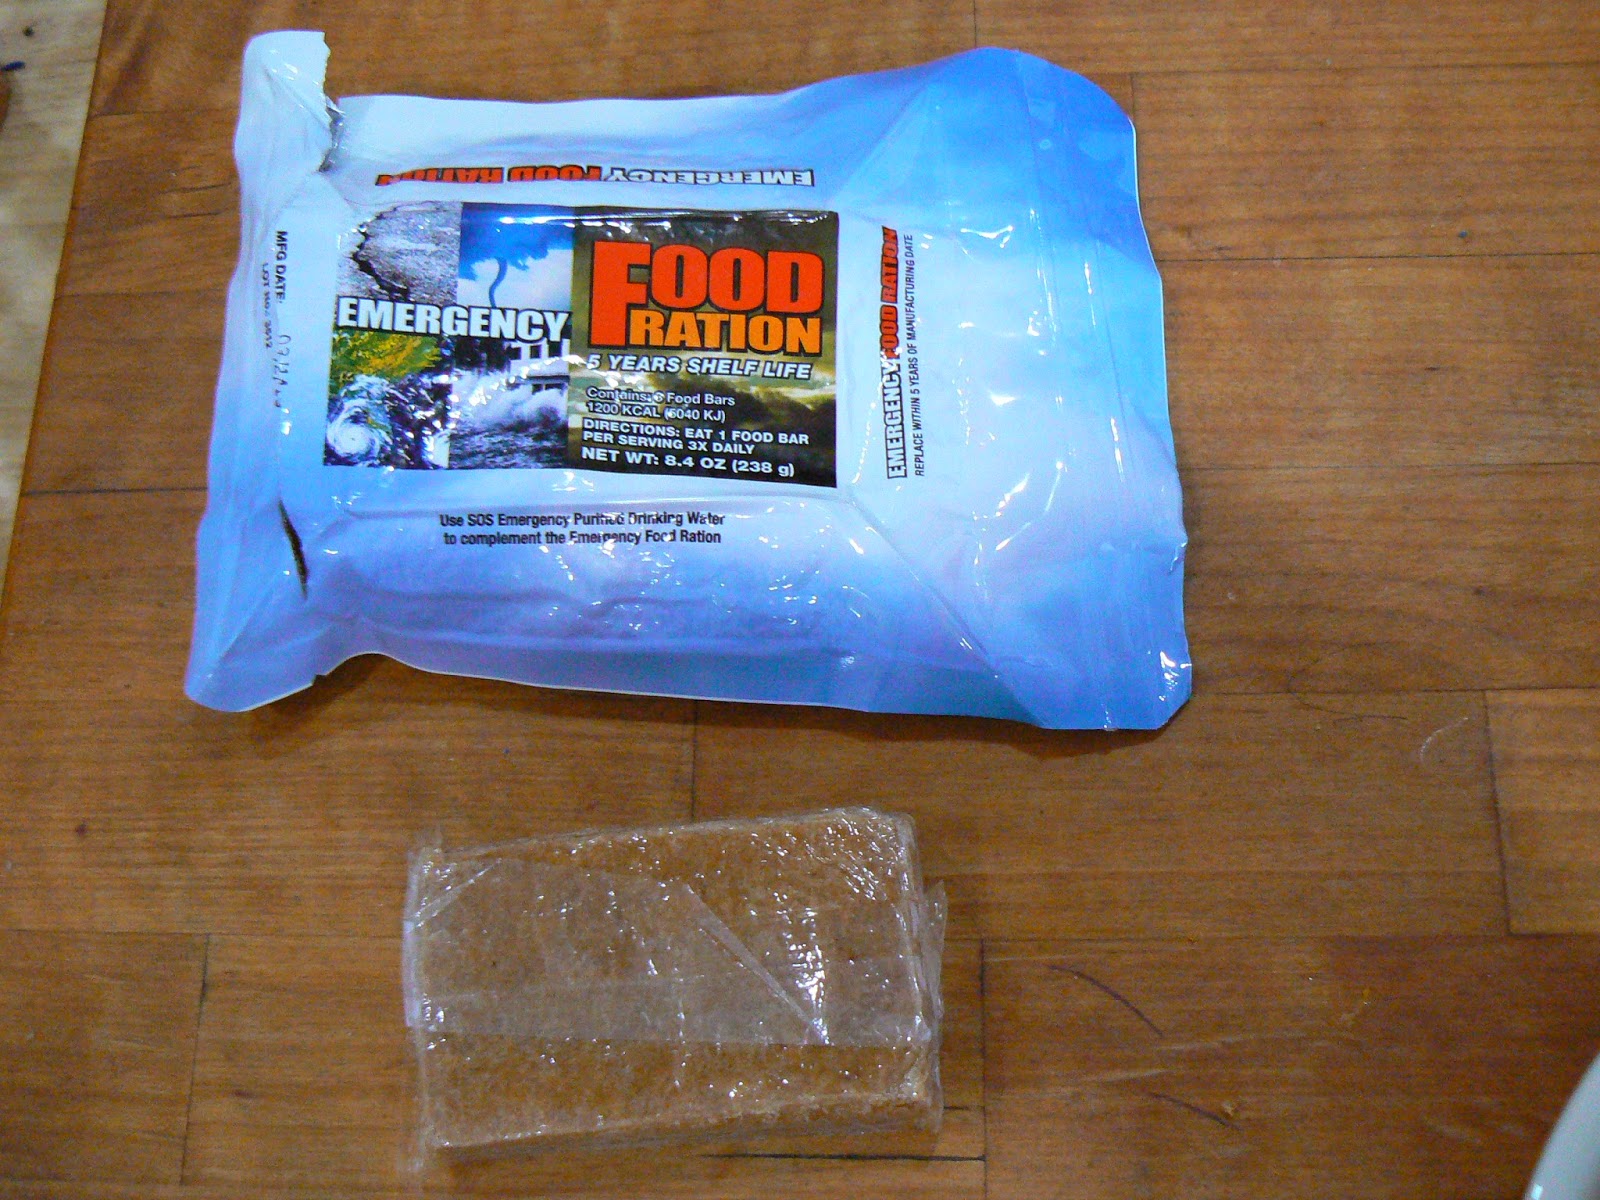
I was looking for lighter and easier food options for my 72 hour kits. I bought a couple emergency food bars to test and see if the family liked them before I bought a lot and filled our kits. I bought the Mainstay Food Bar and the S.O.S Food Bar.

They both came vacuumed sealed in a mylar bag. They both have a 5 year shelf life. And they both have a 'tear here' notch making them simple to open with no tools.


S.O.S Emergency Food Bar 1200 calorie
The SOS bar has 3 individually cellophane wrapped 400 calorie bars. Making it very easy to have a bar a meal. When I first opened it, I was very skeptical about how it would taste, but I was quite surprised. It tastes slightly of coconut and has the texture of a cookie or dry biscuit, without being dry. There is a slight grit to the texture, but it is pleasant. There were a few crumbs, but breaking a bar was simple and nearly crumb free. I had a bar for lunch and found that I was satisfied and didn't need to drink a gallon of water after. In fact, I didn't even have a drink with that "meal".

Mainstay Emergency Bar 2400 calories
The Mainstay bar was not sealed inside the mylar bag, but was portioned out. Breaking a square off was simple and relatively crumb free. The description says a 'pleasant lemon flavor'. It must be very mild, as I didn't notice lemon at all. It was like biting into a sugar cookie. It was very rich and turned slightly creamy as you chewed reminding me of cookie dough. I had intended on having this also for a lunch (on a different day), however after the second bite I started to feel like I had eaten too much raw cookie dough and couldn't finish eating it. I didn't feel hungry or thirsty though. It was too sugary/rich for me.

Then came the real test- The kids


                                                       WE HAVE A WINNER!!!!!

                                  The SOS food bar was the clear winner for the kids.

The Mainstay bar was much thicker than the SOS and the kids couldn't get their small mouths around it. They had to bite the corners and that made for a lot of crumbs.
Both of the bars had great taste, but the S.O.S 3600 calorie is the bar that will be joining our 72 hr kits. I will be putting them inside a ziptop bag to keep them from getting wet or lost once opened.

Wednesday, March 26, 2014

Dehydrating Frozen Vegetables

I'm always looking for ways to preserve food and save money. I like to save the freezer space for items that can't be preserved to be shelf stable.

                            I picked up a bag of frozen peas and diced carrots


                                   Placed them directly from the bag onto the dehydrator.

                                 A few hours later, I have dehydrated peas and carrots.

                                      I was so excited I tried it with a bag of mixed vegetables.

                                               Four cups of frozen vegetables.


A few hours on the dehydrator....
I am left with 1 cup of dehydrated mixed vegetables.

I sealed them with my Food Saver and now they can sit on the shelf.

To reconstitute, add enough warm water to cover desired amount of vegetables. After a few minutes vegetables plumb back to normal and are ready to be used in your meals.

Thursday, November 7, 2013

Roasted Pumpkin Seeds

After I made a bunch of pumpkin puree, I was left with a lot of pumpkin seeds that I couldn't let go to waste. So, I turned to my favorite chef, Alton Brown, for a delicious recipe.

 Wash and dry the seeds. Let dry for at least 8 hours.

Over medium heat add 2 tsp olive oil, once that is good and hot add 1 cup pumpkin seed,  1/2 tsp. salt, and a pinch of pepper. Stir constantly for about 5 minutes or until seeds are nice and brown.

Yummy.

Place the seeds into a paper towel lined bowl to wick away excess oil. Store seeds in an air tight container. Consume with in a week or freeze up to a month. Good luck getting them to last that long. My toddler was eating these by the handful. 

Pumpkin Puree

We all know that fresh tastes better, yet I always just used canned pumpkin. Why? I'm not sure. Now that I have discovered the delicious and heavenly taste of fresh pumpkin puree in my baked goods, I will never be returning to the can. Here's the scoop so you can enjoy the "liquid gold" as well.


Choose a pumpkin that feels firm and heavy for its size. Look for soft spots, mold, wrinkles or open cuts that would indicate damage or early spoilage. Choose a pumpkin with a solidly attached stem. Preheat your oven to 375°.


                                                           Cut a slice out of the pumpkin. 
    Clean all the guts off the slice.Free of all string and seeds (set guts aside to roast the seeds later)

Place meat side down on a jelly-roll pan. Try to keep the pieces the same size to ensure even cooking.
Once your pan is full add a bit of water to the tray to prevent the pumpkin from sticking and to steam it as it bakes.  Bake for about 60 minutes or until the meat is soft. 

Allow the pumpkin to cool for a few minutes so you don't burn your fingers. Then remove the skin.

    Place the cooked, skinless pieces in a blender or food processor. Blend until smooth.
 Transfer the puree to a bowl and allow to cool before placing in freezer safe containers for storage.

Then make delicious baked goods such as pie, cake, cookies, and bread.


Here's my pumpkin bread recipe:     2 1/2 cups all purpose flour
                                                       1 cup whole wheat flour
                                                       3 cups sugar
                                                       2 tsp. baking soda
                                                       2 tsp. cinnamon
                                                       1 tsp. nutmeg
                                                       1 tsp. salt
                                                       16 oz fresh pumpkin puree
                                                       1 cup oil
                                                       4 eggs
                                                       1 cup chocolate chips
  
Preheat oven to 350°. Mix flours, sugar, baking soda, cinnamon, nutmeg, and salt. In a separate bowl mix the pumpkin puree, oil, and eggs.  Add the wet ingredients to the dry and blend well. Add chocolate chips. 
Bake for 60-70 minutes. 
(if you use canned pumpkin puree, (this won't taste as good) you will need to add 2/3 cup of water to the above recipe.)
                                         

Wednesday, November 6, 2013

Dill pickles

 I have made multiple recipes of dill pickles over the years and I think this recipe is my new favorite.
                              The recipe is on the back of the Ball Kosher Dill Pickle Mix.
For every 2 quarts of pickles, you will need:   3 1/2 lbs pickling cucumbers
                                                                  2 cups water
                                                                  1 cup vinegar
                                                                  1/4 cup ball Kosher Dill Pickle Mix
                                                                  2 quart jars with bands and lids

This recipe worked well for me this year as I was growing my own cucumbers and rarely had a large batch to do at once.  Wash and cut the ends off the cucumbers. You can cut them into spears, sandwich slices, halves etc.
             Combine water, vinegar, and pickle mix in a medium sauce pan. Heat to a boil.

Pack sliced pickles into hot jars. Ladle hot pickling liquid over cucumbers leaving 1/2 inch headspace.
Remove air bubbles, wipe rims, and center lids on jars. Apply bands and adjust to fingertip tight.
For preserving up to 1 year process in a water bath canner for 15 minutes. For best flavor, allow pickles to stand for 4-6 weeks.

           Processed pickles ready to eat within 4-6 weeks. Waiting is the hardest part :)