Food Storage:
20 pounds of white sugar or honey
Extra Item:
1 container of dish soap to last 3 months
72 Hour Kit:
1 change of clothing placed in waterproof bag (pants, shirt, socks, underwear)
Family Preparedness:
Obtain a family utility box (i.e. Action Packer, cooler with wheels, rubbermaid container, etc.)
Spiritual Preparedness:
Read "The Temple is about Families " by Richard H. Winkel. Nov. 2006 Ensign. Plan to attend the Temple. (even if it is just to sit on the grounds outside).
Wednesday, June 29, 2011
Monday, June 27, 2011
Wheat

The first thing I think of when I hear "food storage" is wheat. Then I would think, "What in the world am I going to do with all this wheat!?!" I was just storing it because we were instructed to by the first presidency. Well fortunately, I saw the error of my ways and began studying what to do with my wheat, NOW!
The benefits of whole wheat are amazing:
1) It is more nutritious. Whole-wheat flour contains more minerals, vitamins, and natural phytochemicals than white wheat does.
2) Helps with stress. Whole wheat contains B vitamins, which are necessary for healthy nerves.
3) Whole wheat foods provide more fiber than do foods made with white flour. Eating more fiber helps prevent constipation, and many other bowel problems.
4) Helps you lose weight and keep it off! The fiber in whole wheat has almost no calories, keeps you fuller longer, absorbs three times its weight in water, cuts absorption of calories, cleans out impurities, requires more chewing, takes half as much to fill you up, and takes longer to digest.
5) Can lower your blood pressure, your LDL cholesterol level, and your risk of adult-onset diabetes. Reduces your risk of colon cancer and other diseases.
6) Keeps your body emotionally and physically used to something that will be a major staple in your diet if you must live off your food storage for a long period of time.
Wow with all these benefits why would you just leave your wheat sitting in a dark closet?
Lets take a moment to familiarize ourselves with the types of wheat:
There are two varieties of hard winter wheat that is possible to store for 30 years. Nutritionally they are the same, but in color and taste they are different.
Hard Red Wheat has a stronger “nuttier” flavor that can be harder to disguise in your everyday cooking but can make delicious “hearty” tasting bread and is darker in color.
Hard White Wheat has a lighter flavor and color and is easier to disguise in your everyday cooking. (Personally, I store more hard white wheat than the red variety)
For more in-depth information click here.
So where did I start? Whole wheat flour! I spent a few weeks researching wheat grinders and settled on the one that would work best for me. (a Nutrimill)


How long can you store wheat flour?
Room temperature -up to 3 months
Refridgerator - up to 6 months
Freezer - up to 12 months
The first thing I made was oatmeal cookies. I used my regular recipe and just replaced the all-purpose flour with my freshly ground wheat flour. Then the true test came.... I fed it to my husband! As he was eating his 3rd cookie I told him it was 100% whole wheat. He shrugged and said it tasted great!
Here are some tips for finding recipes to use whole wheat in:
- Any recipe with oats will mask the wheat because the oats already give a “hearty” feel to the cookies
- Brown sugar in the recipe will mask any extra brown coloring from the wheat and help make the cookie more chewy. So a recipe that calls for all brown sugar would be ideal.
- Chocolate is a strong flavor that will mask even the pickiest eaters taste buds.
- You don’t have to start out replacing all the all-purpose flour with wheat flour. Start out doing 1/2 all-purpose and 1/2 whole wheat and work your way up to all wheat flour.
- Use white wheat. White wheat doesn’t have the strong taste that red wheat has and is much easier hidden in things like cookies.
- Don’t warn your family before they try it. They will assume that the cookie is how you always make it/
To cook wheat berries:
Stove top Slow cooker
1 cup wheat 1 cup wheat
2 cups water 2 1/2 cups water
1/2 tsp salt 1/2 tsp salt
ST: Place ingredients in a saucepan and bring to a boil. Reduce heat and simmer 1 hour or more until tender. Drain and cool.
SC: Place ingredients in slow cooker. Cook 6-8 hours or overnight on low.


I mixed my wheat berries with half a pound of elk meat and topped with taco seasoning for taco salad.

I also have mixed the wheat berries in with my ground meat for hamburgers, however, we ate them so quickly I forgot to take a picture!
If you are VERY adventurous I have read about substituting meat all together for wheat/ wheat gluten. In my opinion that's just wrong I love me some meat!! Plus my husband said we would have problems if I pulled that one on him. :)
So hopefully you no longer fear your wheat and maybe will start using it on a regular basis.
Friday, June 24, 2011
52 Weeks to Preparedness-Week 2
Preparedness for two people
Food Storage: 8 cans of Cream of Chicken Soup
Extra Item: Laundry Soap to last 2 months
72 Hour Kit: A blanket (wool is preferred) or sleeping bag per person. Also a sleeping mat
Family Preparation: By your night stand place a pair of gloves, flashlight and shoes in case of an emergency in the middle of the night
Spiritual Preparedness:
"When you feel weak, discouraged, depressed, or afraid, open the Book of Mormon and read. Do not let too much time pass before reading a verse, a thought, or a chapter."
President Boyd K. Packer, Ensign, May 2005, p.8.
Thursday, June 16, 2011
Recycling
Did you know that only about 3% of Clark County residents recycle? It is
unfortunate that many people do not recycle, not because they don't want to,
but because they don't understand how to get started. We are lucky in our city
to have a recycling option that is both convenient and FREE--curbside! Here is
how.
Republic Services is a garbage company that picks up curbside
recycling every other week. All that is required is to call their number (702-735-5151) and request the bins. The bins are usually dropped off in front of the house in a few days.
To find out what your pick up schedule is, call the above number. When the recording begins, press 3 for residential service and 3 again to speak with an associate about curbside recycling. Give the person your address and he/she will tell you which recycle calendar to follow. Then, visit www.republicservicesvegas.com, click on Services, Recycling Services, and then the link for the 2011 Residential recycling calendar. Print the calendar out and put in on your fridge to help you remember.
Recycling is simple. Follow these four basic guidelines:
• Red Basket: Aluminum cans, tin cans and plastic bottles. Empty all
cans and plastic bottles. Aluminum cans can be crushed and tin cans
should be rinsed out. Remove all lids from all plastic soda bottles and
milk jugs. Make sure your plastics are recyclable by looking for the
recycling symbols that have a 1 or 2 inside the triangle.
• White Basket: Newspapers, telephone books, and magazines. Please
remove all strings and rubber bands.
• Blue Basket: Glass bottles. Please rinse bottles. Remove caps. Do
not break glass. IMPORTANT: Keep all glass jars and bottles separate
from other recyclables. DO NOT include mirrors, plate glass,
chinaware or ceramics.
• Corrugated Cardboard: Flatten cardboard boxes and place them next
to the recycling baskets
If you live in an apartment complex, there are still recycling options.
Apartment complexes can obtain their own recycling bins (similar to a regular
garbage dumpster) if it is 1) requested by the apartment residences and 2) the
apartment complex management agrees to add it to the property. If your
complex does not offer this service, talk to other residents and bombard the
management with requests! They might approve of the new bin. If not, you
can take your bags of recyclable material directly to the Republic Services
Henderson location at 560 Cape Horn Drive, North Las Vegas Recycle Center location at 333 West Gowan Road, or to you can take recyclables to Whole Foods.
Happy Recycling!!
Tuesday, June 14, 2011
52 weeks to preparedness - week 1
Preparedness for two people.
Food Storage:
8 cans of tuna
72 hour kit:
Obtain from around the house a backpack per person, or a suitcase with wheels
Extra Item:
8 rolls of toilet paper72 hour kit:
Obtain from around the house a backpack per person, or a suitcase with wheels
Family Preparedness:
Store enough water for 72 hours - 1 gallon per person per day
.
Spiritual Preparedness: Read and discuss: "I can sleep when the wind blows"
.
Water
Water storage is extremely important because water is more essential than food in sustaining life during emergency periods. You can live for several days without food, but it is impossible to survive more than a few days without water. Plan to store at least 1 gallon of water per person per day. Take into consideration the size of the person, the amount of exertion being expended, the climate, and perspiration loss. Don't forget to include sufficient water for the family pets as well.
City tap water may be stored for an indefinite period of time without spoilage if simple precautions are taken. Store water in clean "food-grade" or PETE plastic containers. Do not use milk containers or the water that is sold in "milk" type jugs, the plastic is designed to deteriorate and will leak water all over. Stored water should be checked every few months to determine whether containers have leaked or if any undesirable characteristics have developed in appearance, taste or odor. If so, the water should be replaced. You should rotate/replace your water supply once a year. The water will still be good beyond that time, but will not be a desirable taste. Do not add bleach to water that is intended for long-term storage. Add it, if necessary, only at the time of use, then if possible, filter the water after it has been purified with bleach.
 Clean empty juice jugs and 2-liter soda bottles are a great way to start storing water today. Mix 1 tsp of bleach in a quart of water and swish the solution in the plastic bottles to sanitize them. Rinse and fill with clean water. If you have "empty" space in your freezer, store these containers there. It will help your freezer cool more efficiently, keep the contents frozen longer in the event of a power outage, and give you some cool water to drink. Do not use containers previously used to store non-food products. Such as bleach bottles, or laundry soap. Water stored in these containers, even washed very well, is not safe for consumption.
 55 gallon water barrels are another option for water storage. It is recommended to not store these barrels directly on concrete.(yes, the picture is on concrete and outside, but the barrels will not remain there!) The concrete has chemicals in it that can leach into plastic that is stored directly on it. That can then get into the water you are storing in the plastic. Place on cardboard, wood pallets, or other materials. I purchased my barrels from someone on craigslist. Make sure they are food grade and you know exactly what was stored in them before (if they're not new). Example; if they were used to store milk or fruit juice, you can't use them for storing drinking water because you can't get them clean enough -- the fat from the milk/acid from the juice leaches into the plastic and, eventually, molds (per FEMA). There are many websites to purchase new barrels from.

When filling the barrels, use a potable drinking water hose. They are lead free, and available at your local hardware store. Choose wisely where you will keep your barrels since a full 55 gallon drum will weigh 440 pounds. It is best to store water away from direct light and too much heat. If that is not feasible then make sure to check your water more often.
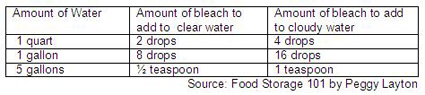
Here is a chart to follow to treat water with bleach if needed:
Tincture of Iodine 2% may also be used to treat water:
Clean water Cloudy water
3 drops per quart 6 drops per quart
12 drops per gallon 24 drops per gallon
Remember that cholera, typhoid fever, dysentery, diarrhea and infectious hepatitis are diseases often associated with unsafe water. Do not take the chance! Under serious disaster conditions, no water- except that which you have properly stored yourself- can be presumed safe, and all drinking and cooking water should be purified, filtered, and distilled.
City tap water may be stored for an indefinite period of time without spoilage if simple precautions are taken. Store water in clean "food-grade" or PETE plastic containers. Do not use milk containers or the water that is sold in "milk" type jugs, the plastic is designed to deteriorate and will leak water all over. Stored water should be checked every few months to determine whether containers have leaked or if any undesirable characteristics have developed in appearance, taste or odor. If so, the water should be replaced. You should rotate/replace your water supply once a year. The water will still be good beyond that time, but will not be a desirable taste. Do not add bleach to water that is intended for long-term storage. Add it, if necessary, only at the time of use, then if possible, filter the water after it has been purified with bleach.

When filling the barrels, use a potable drinking water hose. They are lead free, and available at your local hardware store. Choose wisely where you will keep your barrels since a full 55 gallon drum will weigh 440 pounds. It is best to store water away from direct light and too much heat. If that is not feasible then make sure to check your water more often.
Here is a chart to follow to treat water with bleach if needed:
Tincture of Iodine 2% may also be used to treat water:
Clean water Cloudy water
3 drops per quart 6 drops per quart
12 drops per gallon 24 drops per gallon
Remember that cholera, typhoid fever, dysentery, diarrhea and infectious hepatitis are diseases often associated with unsafe water. Do not take the chance! Under serious disaster conditions, no water- except that which you have properly stored yourself- can be presumed safe, and all drinking and cooking water should be purified, filtered, and distilled.
Thursday, June 9, 2011
Ice cream
I scream you scream we all scream for ice cream. Who doesn't love a bowl of good ice cream? I know I sure do. This recipe is the best "base" recipe I have ever used. From this recipe you can make all sorts of delicious varieties of ice cream. From this base I have made vanilla, chocolate, peach, mint and mint chip. The combinations are endless.
Now we aren't here to make a "low-fat", but we are making the BEST tasting ice cream. And really when ice cream is such a treat, why would you want to ruin it and make it "low-fat"?
 Gather your ingredients:
9 oz sugar (1 1/4 cups)
8 egg yolks
3 cups half & half
2 tsp vanilla extract
1 cup heavy cream
You will also need a thermometer(prefer a digital instant read), and an ice cream maker(prefer one with a removable core that freezes)
 In a medium pot add the cream and half & half. Apply medium heat and let it come just to a simmer.

Add the egg yolks to a mixing bowl and whisk until light and creamy. I cheated and used my mixer, but hey that's why I bought it right? Right!
Next you will s-l-o-w-l-y add the sugar to the egg yolks while stirring.

The mixture will lighten in color and thicken, until it falls off the whisk in a long ribbon.
As soon as your dairy mixture obtains bare bubbling, kill the heat and grab a ladle .
 Temper the dairy into the eggs. To temper means to add a small amount of a hot liquid into relatively cooler eggs in order to warm them up without scrambling them. Once you have slowly whisked in about 1/3 of the dairy you can add the rest of the dairy to the eggs.
 Return the mixture to a medium pot and turn the heat back on LOW. Bring the entire mixture to 170F.
You can confirm that the mixture is done by dipping a spoon in the mixture, turning it over and "drawing a line" with your finger down the back if the line stays separated then it is perfect.

(Chocolate mixture with 2 tsp of vanilla extract.) Once it has cooled you can place it in the fridge to help cool it faster. The temperature you are looking for is 40F, usually takes about 4 hours. I get impatient waiting, so I will either do this the night before and let it sit overnight or I will put it in the freezer and continually check the temperature.
 Once your mixture has reached 40F you may add it to your ice cream maker. Follow the instructions in your manual. Mine takes 20 minutes. This is also the time I added in mint chips.
 After 20 minutes, remove it from the ice cream maker and place in a seal-able freezer safe container. You may either eat it soft serve now or freeze it for a few hours. This recipe will make 1.5 quarts of ice cream.
Now we aren't here to make a "low-fat", but we are making the BEST tasting ice cream. And really when ice cream is such a treat, why would you want to ruin it and make it "low-fat"?

9 oz sugar (1 1/4 cups)
8 egg yolks
3 cups half & half
2 tsp vanilla extract
1 cup heavy cream
You will also need a thermometer(prefer a digital instant read), and an ice cream maker(prefer one with a removable core that freezes)


Add the egg yolks to a mixing bowl and whisk until light and creamy. I cheated and used my mixer, but hey that's why I bought it right? Right!
Next you will s-l-o-w-l-y add the sugar to the egg yolks while stirring.

The mixture will lighten in color and thicken, until it falls off the whisk in a long ribbon.
As soon as your dairy mixture obtains bare bubbling, kill the heat and grab a ladle .


You can confirm that the mixture is done by dipping a spoon in the mixture, turning it over and "drawing a line" with your finger down the back if the line stays separated then it is perfect.
Kill the heat and transfer your mixture to a metal bowl to cool. Once it has cooled a little you can add the flavor you want the ice cream to be. Just 2 tsp of your preferred extract will do. Or if you are aiming for chocolate take a ladle full (or two) and mix in 1/3 cup dutch processed cocoa powder, then return to the bowl.


Tuesday, June 7, 2011
Jerky
You don't need a fancy dehydrator to make great tasting jerky. Most dehydrators can't circulate air fast enough to dry out meat alone so they use heat to dry it out. The problem with heat is that your meat is slowly cooking and that will change the flavor and texture of your jerky. What you need is cool dry air. Let me show you how it's done.

First gather the ingredients:
2 pounds of flank steak (or other lean cut) (elk or venison are superb choices)
2/3 cup of soy sauce
2/3 cup of Worcestershire sauce
1 T honey
2 tsp ground black pepper
2 tsp onion powder
1 tsp red pepper flakes
1 tsp liquid smoke
3-4 air filters with grooves (prefer cellulose over fiberglass)
1 box fan
Wrap your steak in plastic wrap and place in the freezer until just frozen. This will aid you in slicing thin strips. Mix the rest of the ingredients together in a bowl to create your marinade.

Once your steak is almost frozen take it out of the freezer and remove any excess fat.

Cut thin strips with the grain of the meat. About the size of a piece of bacon.
 Add the strips of meat into a zip top bag and pour in the marinade. Remove as much air as possible from the bag before sealing. Move the meat within the bag to get all pieces coated in the deliciousness of the marinade.

Place the bag in a bowl to ensure that all the meat remains submerged, and place in your refrigerator for 3-6 hours. No more, no less. If under 3 hours the marinade will not have enough time to work its magic and if over 6 hours it will be too salty.
 After 3-6 hours remove the meat from the marinade and pat dry with paper towels.
 Then lay the strips out in your filter grooves, like so. Mine took 2 filters filled with jerky and an empty filter placed on top to hold the meat in place.


Then stack your filters on your fan and secure with a bungee cord. Turn your fan on high and walk away. I put mine on the back porch because I was tired of the cat howling and trying to get into the meat. But if you love the smell then keep it in the house. Check on the meat after 8 hours but it normally takes 13 hours for it to be complete.

After drying overnight my jerky is done. It may not be attractive, but my taste buds don't care!

Don't store your jerky in a zip top bag, it will trap moisture against the meat, partially re-hydrating it, and you will have mold in less than a month. Use a container that is nice and open with plenty of room and air in it, then your jerky will keep for years.
I would like to thank Alton Brown for this delicious recipe.

First gather the ingredients:
2 pounds of flank steak (or other lean cut) (elk or venison are superb choices)
2/3 cup of soy sauce
2/3 cup of Worcestershire sauce
1 T honey
2 tsp ground black pepper
2 tsp onion powder
1 tsp red pepper flakes
1 tsp liquid smoke
3-4 air filters with grooves (prefer cellulose over fiberglass)
1 box fan
Wrap your steak in plastic wrap and place in the freezer until just frozen. This will aid you in slicing thin strips. Mix the rest of the ingredients together in a bowl to create your marinade.

Once your steak is almost frozen take it out of the freezer and remove any excess fat.

Cut thin strips with the grain of the meat. About the size of a piece of bacon.


Place the bag in a bowl to ensure that all the meat remains submerged, and place in your refrigerator for 3-6 hours. No more, no less. If under 3 hours the marinade will not have enough time to work its magic and if over 6 hours it will be too salty.


Then stack your filters on your fan and secure with a bungee cord. Turn your fan on high and walk away. I put mine on the back porch because I was tired of the cat howling and trying to get into the meat. But if you love the smell then keep it in the house. Check on the meat after 8 hours but it normally takes 13 hours for it to be complete.

After drying overnight my jerky is done. It may not be attractive, but my taste buds don't care!

Don't store your jerky in a zip top bag, it will trap moisture against the meat, partially re-hydrating it, and you will have mold in less than a month. Use a container that is nice and open with plenty of room and air in it, then your jerky will keep for years.
I would like to thank Alton Brown for this delicious recipe.
Subscribe to:
Posts (Atom)